Un-ghosted MasterPage; extra type-safe parser check

Last night we came across a strange issue when updating a Publishing sites MasterPage. We have deployed the MasterPage through a SharePoint Feature, and wanted to upgrade the MasterPage. Only a small addition had been made, but because the solution contained a lot more changes that had not been tested yet, we opted to change the MasterPage through SharePoint Designer. We would then, after the solution had been fully tested and upgraded, restore the MasterPage back to the site definition and all would be well. We were wrong.

As soon as we changed the MasterPage through SharePoint designer, the site started throwing ‘The type is not registered as safe’ errors. Which is weird, because we did not change a thing that was remotely related to this error message. When resetting the MasterPage back to the site definition, everything was working fine, even though the web.config had not changed at all. After puzzling for several hours we figured it out.

When you change a MasterPage in any way outside of the solution, SharePoint automatically creates an un-ghosted copy of this MasterPage. When doing so, the page is now being checked by the SafeMode parser, instead of the ASP.Net parser. The SafeMode parser ensures all controls referenced on the MasterPage are listed as safe control in the web.config. In our case it wasn’t, which caused the un-ghosted MasterPage to throw an error.

In order to fix this error, you can revert the MasterPage back to its ghosted condition by following these steps:

  • Go to Site Settings
  • Go to Reset to Site Definition
  • Fill in the complete URL to the MasterPages’ location, and hit OK

Unfortunately for us this meant that we could not simply update just the MasterPage and had to wait for the entire solution to be tested before we could implement the new MasterPage.

A very good link to use for the difference between ghosted, unghosted and ghostableinlibrary can be found here: http://magenic.com/Blog/GhostedUnghostedandGhostableInLibrary . The difference between the ASP.Net parser and the SafeMode parser can be found in great detail here: http://www.bluedoglimited.com/SharePointThoughts/Lists/Posts/Post.aspx?ID=4

CAML Query to include all folders

I was working on a CAML query that retrieves all pages in a Publishing Web pages library, based on the content type. However, later on in the project, all these pages were moved into their corrosponding sub-folders. Instantly, my previously working CAML query stopped working as excepted.

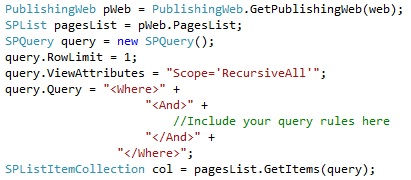
The catch was, in order for a CAML query to include folders and subfolders when executing, you have to set the ‘ViewAttributes’ property to “Scope=’RecursiveAll'”. Otherwise only the root folder will be searched.

The entire CAML Query would look something like this:

The complete caml query, including the scope.

The complete caml query, including the scope.

Gotcha!

Export modified default Workflow to .wsp

Today I wanted to use a SharePoint 2010 based workflow in SharePoint 2013. I choose for a default workflow, and modified the workflow in a few different areas, such as the default emails that were being sent out. That Approval Workflow is great, except for the dodgy emails you get right?

Since I work in a team, it was important that the rest of my team members were also able to install the same workflow, without having to edit it themselves. So I needed a way of exporting the workflow to Visual Studio. What surprised me was that the ‘Save as template’ option was greyed out. 

Workflow_1As the documentation at http://msdn.microsoft.com/en-us/library/jj819316.aspx describes, you can only save a SharePoint 2010 based workflow as a template if this is a Reusable Workflow. However, the default workflows provided with a SharePoint 2013 Publishing site are all globally reusable workflows. Thus, the export button is greyed out.

Resolving this issue is actually very straight forward. If you click on the ‘Copy and Modify’ button:

Workflow_2

You will be prompted for a few different options. For the ‘Choose a base contenttype’ option, make sure you select ‘All’, otherwise chances are you will not get the option to use this workflow for creating major versions of a page (in case you are modifying the approval workflow). Give the workflow a name and description and click OK. The newly created workflow will be a reusable workflow, and not a globally reusable workflow. This means the ‘Save as template’ option is no longer greyed out, and you can continue on exporting the workflow as .wsp which you can then import into Visual Studio for all your team members to enjoy. Gotcha!Workflow_3

Web Template and Multi-server farm

Today I came across a weird issue when trying to provision a custom web template through Central Administration. I had created the onet file and things worked fine in my development environment. However when switching to the test environment, selecting my template from the Central Administration ‘Create Site Collection’ page and hitting ‘Create Site’ resulted in errors: Feature with ID {guid} is not installed in this farm.

That’s weird, right? I am sure I have deployed my solutions to the Web Application that the site collection was to be created at. Turns out, if you have a multi-server farm and your Application Server is not hosting the Web Applications – deploying a solution to a specific Web Application does not install the features for the Application Server thus – it cannot find them.

The solution is simple: When creating the site collection from the Central Administration, pick the ‘Select a template later’ option. After the site has been created – browse to it and select your custom template. Since you are now on the site, the code will be executed by the Web Frontend Server which can find your installed solutions no problem. Gotcha!